In This Post I Am Going To Show You How To Use And Install Netcat In Termux. I Will Simply The Process Of Installation And Use Of Netcat In Termux. First I Will Tell You The Basic Details About Netcat Then I Will Show You How To Install And Use Netcat In Termux. I Will Show You How To Create Chat Servers And How To Transfer Files Followed By The Creation Of A Server In Termux. Make Sure TO Read This Article Fully To Understand And Use Netcat In Termux Without Errors.
What Is Netcat?
Netcat Is A Popular Network Based Tool That Can Be Used To Transfer Files Securely Through Network And Create Simple Chat Servers And Much More. This Tool Is Also Known As The Swiss Army Knife Of Networking. This Tool Can Also Be Used To Create Backdoors For Remote Access Of Any Device.
How To Install Netcat In Termux?
Follow The Below Steps One By One To Install Netcat In Termux. These Steps Should Be Followed In A Proper Way To Avoid Errors In Termux. Make Sure That These Commands Are Case Sensitive So We Must Type The Accurate Command Memtioned.
Step 1: First Of All You Need To Open Your Command Line Utility Or Termux In Your Android Device.
Step 2: Now Go For The First Command As pkg update && pkg upgrade -y In Termux To Update Termux Fully.
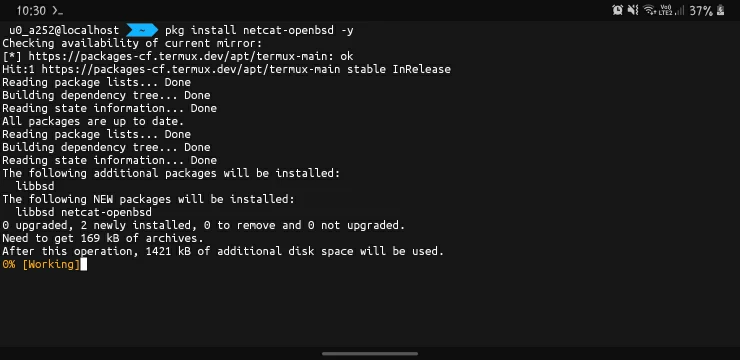
pkg update && pkg upgrade -yStep 3: Now Start The Installation Of Netcat In Termux Using pkg install netcat-openbsd -y Command.
pkg install netcat-openbsd -y
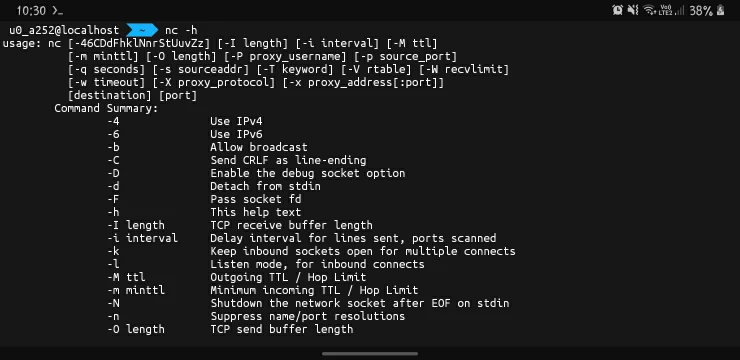
Step 4: After The Installation Has Been Finished In Termux We Need To Verify If It Has Been Installed Properly Using nc -h Command.
nc -h
We Have Completed The Insta;;ation Of The Netcat In Termux. Though The Installation Of This Tool Was Very Easy We Need To Setup Things To Use Netcat In Termux. Once The Netcat Tool Has Been Installed Now We Can Do A Lot Of Amazing This In Termux.
How To Use Netcat In Termux?
Netcat Can Be Used For Many Purposes In Termux. We Will Deal With A Few In This Tutorial. I Will Show You How To Transfer Files Using Netcat Then We Will See How To Create A Chat Server In Termux Followed By The Creation Of A Web Server In Termux. Follow The Steps Of Each Thing Below.
How To Create A Simple Chat Server In Termux?
We Will Just Type Simple Command In Termux After The Installation Of Netcat To Create A Chat Server In Termux.
First Device: One The First Device Type nc -lvp 8888 Command.
nc -lvp 8888Second Device: On The Second Device Type nc [server-ip] 8888 Command. (Change [server-ip] With The IP Address Of The Server)
nc [server-ip] 8888We Have Created A Chat Server Using Netcat In Termux. Now What You Type On One Device Will Appear On Other Device. Make Sure The Devices Must Be On The Same Network.
How To Transfer Files Between Two Devices In Termux?
We Will Transfer Files Between Two Devices In Termux By Typing Different Commands On Both Devices.
Sending Device: On Sending Device You Just Need To Type cat file.txt | nc [receiver-ip] 8888 Command To Send file.txt To Other Device.
cat file.txt | nc [receiver-ip] 8888Receiving Device: On Receiving Device You Need To Type nc -lvp 8888 > file.txt Command To Receive The Files From The Sending Device.
nc -lvp 8888 > file.txtWe Have Successfully Sent And Recieved The Files Accross Two Devices In Termux. These Two Devices Must Be Also On The Same Network With Netcat Installed In Each Of Them.
How To Create A Simple HTTP Server In Termux?
We Will Create A HTTP Server In Termux Using Netcat. After The Installation Of Netcat We Will Need A HTML File Of The Web Page That You Want To Upload To The Server. Change The Name Of The File To index.html In Termux.
Step 1: Type while true; do nc -lvp 8080 < index.html; done Conmand To Make The HTML File Available On The Server.
while true; do nc -lvp 8080 < index.html; done
Step 2: Now If You Visit You Network IP Followed The Port In The Command (8080). You Can See The Web Page (index.html) Is Live On That Address. Make Sure You Have A Proper Page To Upload.
We Have Completed This Step To Create An HTTP Server In Termux. I Hope You Have Understand This Post.
How To Check If The Port Is Open For Any Website?
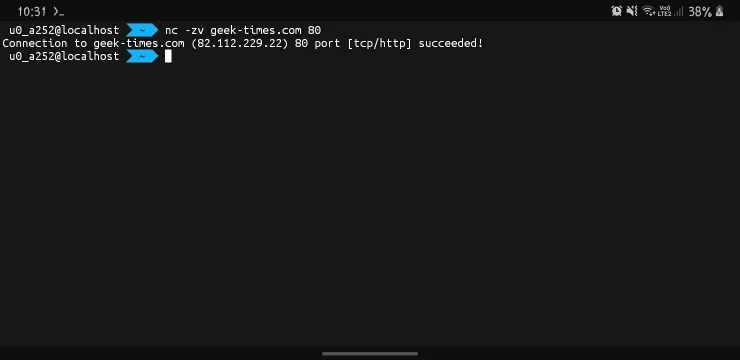
To Check If Any Port Is Open For The Website You Just Need To Type nc -zv example.com 80 Command In Termux To Check Its Availablity. Change The Port Name According To Your Own Use.
nc -zv example.com 80These Were Some Common And Basic Uses Of Netcat Tool. These Commands Can Be Also Functional In Kali Linux And Ubuntu. If Followed With Proper Guiding.
How To Remove Netcat From Termux
If Somehow You Need To Remove The Netcat From Termxu You Can Do It Just By Typing A Simple Command In Termux. You Need To Type pkg uninstall netcat-openbsd Command To Remove Netcat From Termux.
pkg uninstall netcat-openbsdMake Sure This Command Will Remove The Netcat And Its Files Permenantly From Termux. One Must Use This Command After Backing Up The Important Netcat Files In Termux.
Conclusion:
Netcat Is A Verstalie Tool That Can Be Used To Read And Write Data Over Network Connection Using TCP And UDP Protocols. This Tool Is Much Essential For Ethical Hackers And Bug Bounty Members Also. This Tool Has Been Designed To Be A Dependable Back-end That Can Be Used Directly Or Easily Driven By Other Programs And Scripts. This Is All About Installing And Using Netcat In Termux. I Hope You Have Liked This Post. If You Have Any Questions Reagrding This Post You Can Tell Me In The Comments. Thanks For Reading.
Frequently Asked Questions:
What Is Netcat Used For?
Netcat Has Been Designed To Be A Dependable Backend That Can Be Used Directly Or Easily Driven By Other Programs And Scripts
Does Netcat Requires Root?
For Most And Simple Tasks Netcat Does Not Require Any Root Permissions In Termux.
Is Netcat Preinstalled In Kali Linux?
Yes Netcat Is Presinstalled In Kali Linux And Can Be Used With The Same Commands As In Termux.


